SpringBoot学习笔记【一】整合 Mybatis + Druid + Swagger2

本文以Maven构建SpringBoot项目,并整合Mybatis、Druid和Swagger2,实现Druid监控和在线API文档的功能。

添加依赖

pom.xml中依赖包如下所示:

1
2
3
4
5
6
7
8
9
10
11
12
13
14
15
16
17
18
19
20
21
22
23
24
25
26
27
28
29
30
31
32
33
34
35
36
37
38
39
40
41
42
43
44
45
46
47
48
49
50
51
52
53
54
55
56
57
58
59
60
61
62
63
64
65
66
67
68
69
<dependencies>
<dependency>
<groupId>org.springframework.boot</groupId>
<artifactId>spring-boot-starter-web</artifactId>
<exclusions> <!-- 去掉Spring默认的日志插件 -->
<exclusion>
<groupId>org.springframework.boot</groupId>
<artifactId>spring-boot-starter-logging</artifactId>
</exclusion>
</exclusions>
</dependency>

<dependency>
<groupId>org.springframework.boot</groupId>
<artifactId>spring-boot-starter-test</artifactId>
<scope>test</scope>
</dependency>

<!-- 热部署 修改classpath下的文件springboot自动重启 -->
<dependency>
<groupId>org.springframework.boot</groupId>
<artifactId>spring-boot-devtools</artifactId>
<optional>true</optional>
</dependency>

<!-- mybatis -->
<dependency>
<groupId>org.mybatis.spring.boot</groupId>
<artifactId>mybatis-spring-boot-starter</artifactId>
</dependency>

<!-- druid -->
<dependency>
<groupId>com.alibaba</groupId>
<artifactId>druid-spring-boot-starter</artifactId>
</dependency>

<!-- log4j2 -->
<dependency>
<groupId>org.springframework.boot</groupId>
<artifactId>spring-boot-starter-log4j2</artifactId>
</dependency>

<dependency>
<groupId>com.alibaba</groupId>
<artifactId>fastjson</artifactId>
</dependency>

<dependency>
<groupId>mysql</groupId>
<artifactId>mysql-connector-java</artifactId>
</dependency>

<!-- api文档 swagger2 -->
<dependency>
<groupId>io.springfox</groupId>
<artifactId>springfox-swagger2</artifactId>
</dependency>

<dependency>
<groupId>io.springfox</groupId>
<artifactId>springfox-swagger-ui</artifactId>
</dependency>

<dependency>
<groupId>com.greedystar</groupId>
<artifactId>generator</artifactId>
</dependency>
</dependencies>

配置

配置文件

Druid、Mybatis和log4j2能够很好的支持SpringBoot,这里直接在配置文件application.yml中对其进行配置,配置项的描述已经在文件中进行了注释,这里就不多说了,application.yml内容如下:

我们可以看到,使用SpringBoot后,需要进行的配置的确变简单了,这就是“习惯优于配置”为我们带来的便利。

从此以后,再也不用对老板说:别急,我马上就要配置完了!

附:DruidDataSource配置属性列表

1
2
3
4
5
6
7
8
9
10
11
12
13
14
15
16
17
18
19
20
21
22
23
24
25
26
27
28
29
30
31
32
33
34
35
36
37
38
39
40
41
42
43
44
45
46
47
48
49
50
51
52
53
54
55
56
57
58
59
60
61
62
63
64
65
66
67
68
69
70
71
72
73
74
75
76
77
78
79
80
81
82
83
84
85
86
87
88
server:
port: 8800
spring:
datasource:
type: com.alibaba.druid.pool.DruidDataSource
druid:
driver-class-name: com.mysql.jdbc.Driver
url: jdbc:mysql://localhost:3306/spring-boot-demo?useUnicode=true&characterEncoding=utf8
username: root
password:
# 初始化时建立的连接数
initial-size: 5
# 最大连接数
max-active: 20
# 最小连接数
min-idle: 5
# 获取连接最大等待时间,单位:毫秒
max-wait: 2000
# 是否缓存preparedStatement
pool-prepared-statements: false
# 最大preparedStatement缓存数,当pool-prepared-statements=true时需要大于0
max-pool-prepared-statement-per-connection-size: -1
# 检测连接是否失效的sql
validation-query: SELECT 'x'
# 检测连接是否失效的超时时间,单位:秒
validation-query-timeout: 2
filters: stat,wall,log4j2
# Spring aop监控的包路径
aop-patterns: cn.greedystar.springbootdemo.modules.service.*
filter:
# 监控统计
stat:
enabled: true
db-type: mysql
# 打印慢sql
log-slow-sql: true
# 超过200毫秒即为慢sql
slow-sql-millis: 200
# sql防火墙
wall:
enabled: true
db-type: mysql
# 对认定的攻击sql进行日志输出
log-violation: true
# 对认定的攻击sql抛出异常
throw-exception: true
config:
# 是否允许下述操作
alter-table-allow: false
truncate-allow: false
drop-table-allow: false
update-where-none-check: true
# metadata会暴露数据的表结构
metadata-allow: false
# 日志
log4j2:
enabled: true
# log4j2仅记录druid的sql执行日志
statement-log-enabled: false
connection-log-enabled: false
result-set-log-enabled: false
statement-executable-sql-log-enable: true
# 数据库连接池监控统计插件
web-stat-filter:
enabled: true
url-pattern: /*
# 过滤掉如下请求
exclusions: '*.gif,*.png,*.jpg,*.html,*.js,*.css,*.ico,/druid/*'
# 数据库连接池监控页面插件
stat-view-servlet:
enabled: true
url-pattern: '/druid/*'
reset-enable: true
login-username: admin
login-password: admin
allow:
deny:

# 设置cglib代理模式,防止非接口代理出错
aop:
proxy-target-class: true

# mybatis映射文件路径
mybatis:
mapper-locations: classpath*:mappers/*Mapper.xml
# 日志配置文件
logging:
config: classpath:log/log4j2.xml

log4j2配置文件log4j2.xml参考自Druid的官方wiki:Druid中使用log4j2进行日志输出,将日志输出级别改为了INFO,这里就不贴出来了。

到这里,Druid的配置就算完成了。

Mybatis的配置除了在配置文件中指定Mapper映射文件的路径外,还要告知应用程序扫描Mapper接口,有两种方式可以实现:

其一,在应用程序入口类上加上Mapper接口的扫描@MapperScan,并指定Mapper接口的包路径,如下所示:

1
2
3
4
5
6
7
@SpringBootApplication
@MapperScan("com.greedystar.sample1.dao")
public class Sample1Application {
public static void main(String[] args) {
SpringApplication.run(Sample1Application.class, args);
}
}

其二,在Mapper接口类上加上注解@Mapper,如下所示:

1
2
3
4
@Mapper
public interface UserDao extends BaseDao<User> {
List<User> findUserList(User user);
}

注意:网上很多资料将以上两种配置方式形容为必须一起使用,这种情况下还是要自己多试一试。

至此,Druid和Mybatis的配置工作就完成了。

配置类

这里使用了Spring3.0引入的注解@Configuration,在@Configuration注解的类中可以定义多个由@Bean注解的方法,用于创建Bean,与在配置文件中定义的效果是一样的,本文中使用@Configuration注解配置Swagger2,如下所示:

1
2
3
4
5
6
7
8
9
10
11
12
13
14
15
16
17
18
19
20
21
22
23
24
25
26
27
28
29
30
31
32
33
@Configuration
@EnableSwagger2
public class SwaggerConfig {

/**
* 创建API应用
* apiInfo() 增加API相关信息
* 通过select()函数返回一个ApiSelectorBuilder实例,指定扫描的包路径来定义要建立API的controller目录。
*/
@Bean
public Docket createRestApi() {
return new Docket(DocumentationType.SWAGGER_2)
.apiInfo(apiInfo())
.select()
.apis(RequestHandlerSelectors.basePackage("com.greedystar.sample1.web"))
.paths(PathSelectors.any())
.build();
}

/**
* 创建该API的基本信息(这些基本信息会展现在文档页面中)
* 访问地址:http://项目实际地址/swagger-ui.html
*/
private ApiInfo apiInfo() {
return new ApiInfoBuilder()
.title("利用swagger构建api文档")
.description("更多请关注 https://www.greedystar.com")
.termsOfServiceUrl("https://www.greedystar.com")
.version("1.0.0")
.build();
}

}

Swagger2的配置中指定了扫描controller的路径,下面我们来看一看controller中如何配置Api文档的数据,在下面这段代码中,我们使用了@ApiOperation和@ApiImplicitParam来配置Api文档的数据,具体如下所示:

1
2
3
4
5
6
7
8
9
10
11
12
13
14
15
16
17
18
19
20
21
22
@RestController
@RequestMapping(value = "/user")
public class UserController {
@Autowired
private UserService userService;

@ApiOperation(value = "获取所有用户列表", notes = "获取所有用户列表")
@RequestMapping(value = {"/list", ""}, method = RequestMethod.GET)
public Object list() {
List<User> users = userService.findAllList();
return users;
}

@ApiOperation(value = "获取用户详细信息", notes = "根据id来获取用户详细信息")
@ApiImplicitParam(name = "id", value = "用户ID", required = true, dataType = "String", paramType = "query")
@RequestMapping(value = {"/get"}, method = RequestMethod.GET)
public Object get(@RequestParam String id) {
User user = userService.get(id);
return user;
}

}

至此,Swagger2的简单配置就完成了。

测试

Druid监控

在Druid的监控设置中,我们将监控平台的路径设置为/druid/,下面让我们看一看监控平台的样子,访问监控页面需要输入用户名和密码,这是我们先前配置的,进入监控平台后的页面如下:

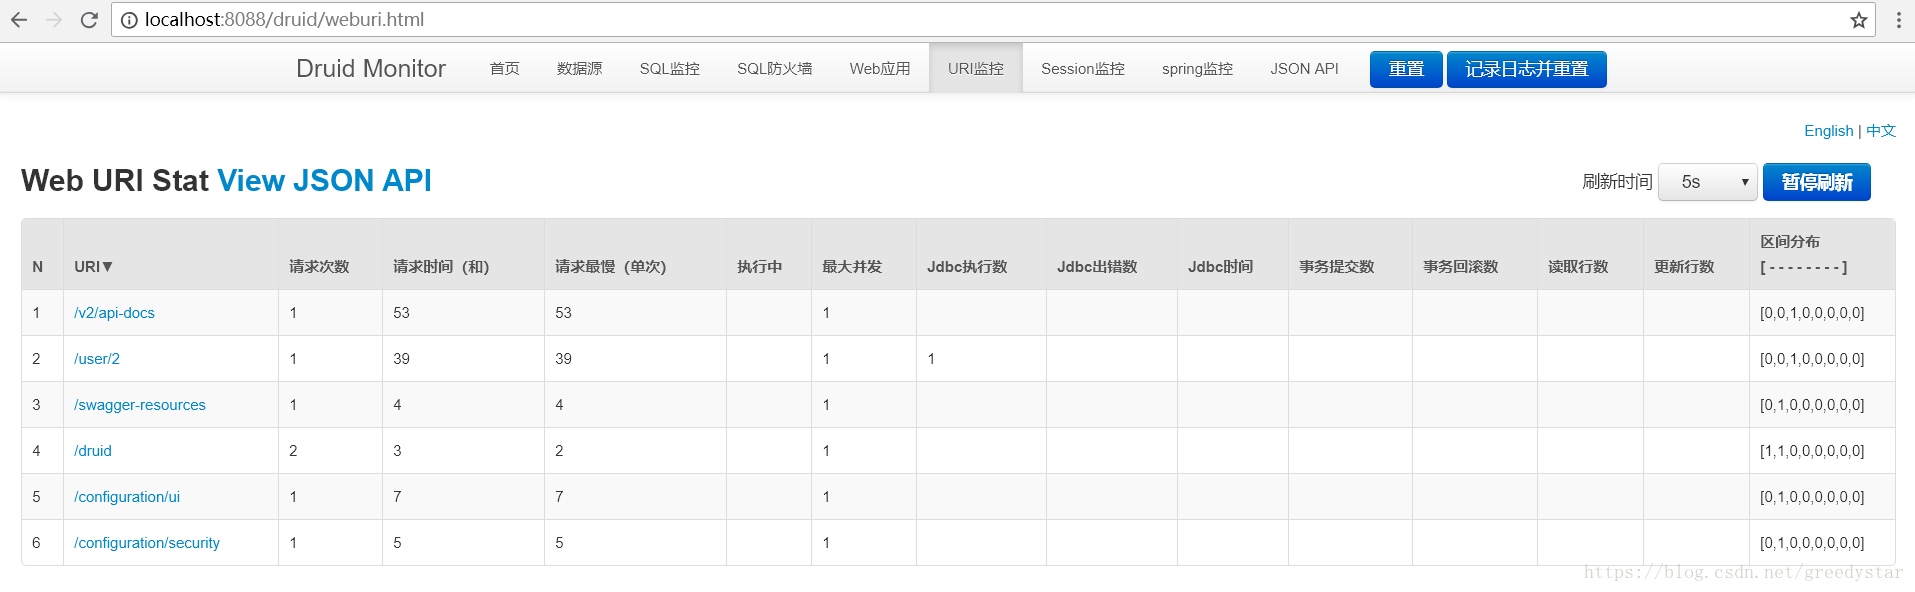
在顶级导航栏中我们看到Druid监控平台的主要功能,具体的监控功能还需要进一步学习。

需要指出的是,Druid监控平台是基于内存数据的,在我们使用的过程中需要根据需要进行监控数据的持久化。

日志记录

我们在log4j2.xml中配置了日志的记录方式,将日志文件保存在./logs/下,在项目目录下会生成一个logs文件夹,其中按月份组织日志文件,如下所示:

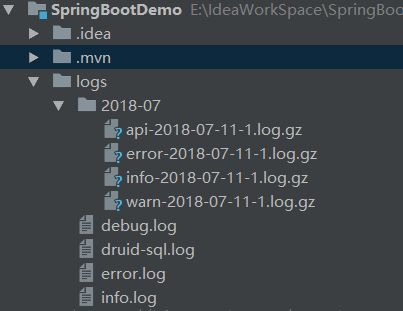
其中druid-sql.log是我们设置的druid sql执行记录,部分内容如下:

1
2
3
4
5
6
7
8
9
10
11
12
13
14
15
16
17
18
19
20
21
22
23
24
[2018-07-12 18:45:18] DEBUG 137 statementLog - {conn-10005, pstmt-20001} executed. SELECT

a.id AS "id",
a.name AS "name"

FROM user a
[2018-07-12 18:46:11] DEBUG 137 statementLog - {conn-10005, pstmt-20000} executed. SELECT

a.id AS "id",
a.name AS "name"

FROM user a
[2018-07-12 18:53:27] DEBUG 137 statementLog - {conn-10005, pstmt-20000} executed. SELECT

a.id AS "id",
a.name AS "name"

FROM user a
[2018-07-12 18:53:58] DEBUG 137 statementLog - {conn-10005, pstmt-20000} executed. SELECT

a.id AS "id",
a.name AS "name"

FROM user a

在线API文档

界面如下图所示:

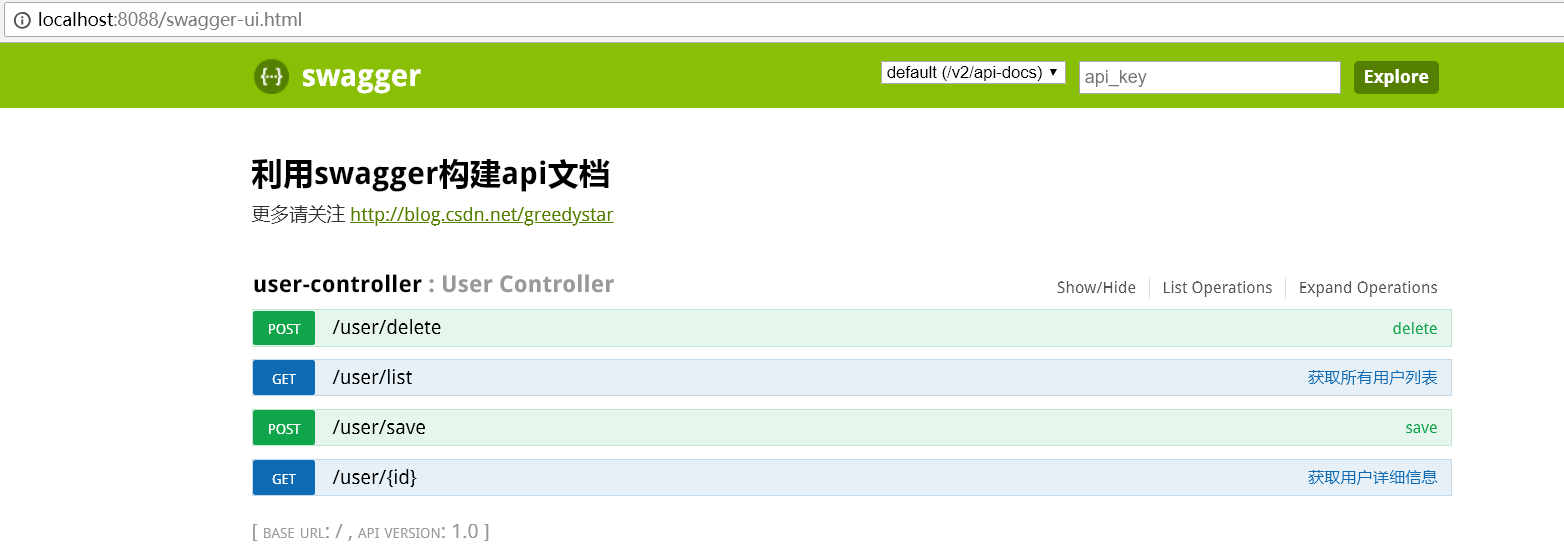
这里不仅可以查看配置的接口信息,而且可以用于测试接口,我们以/user/list为例进行测试
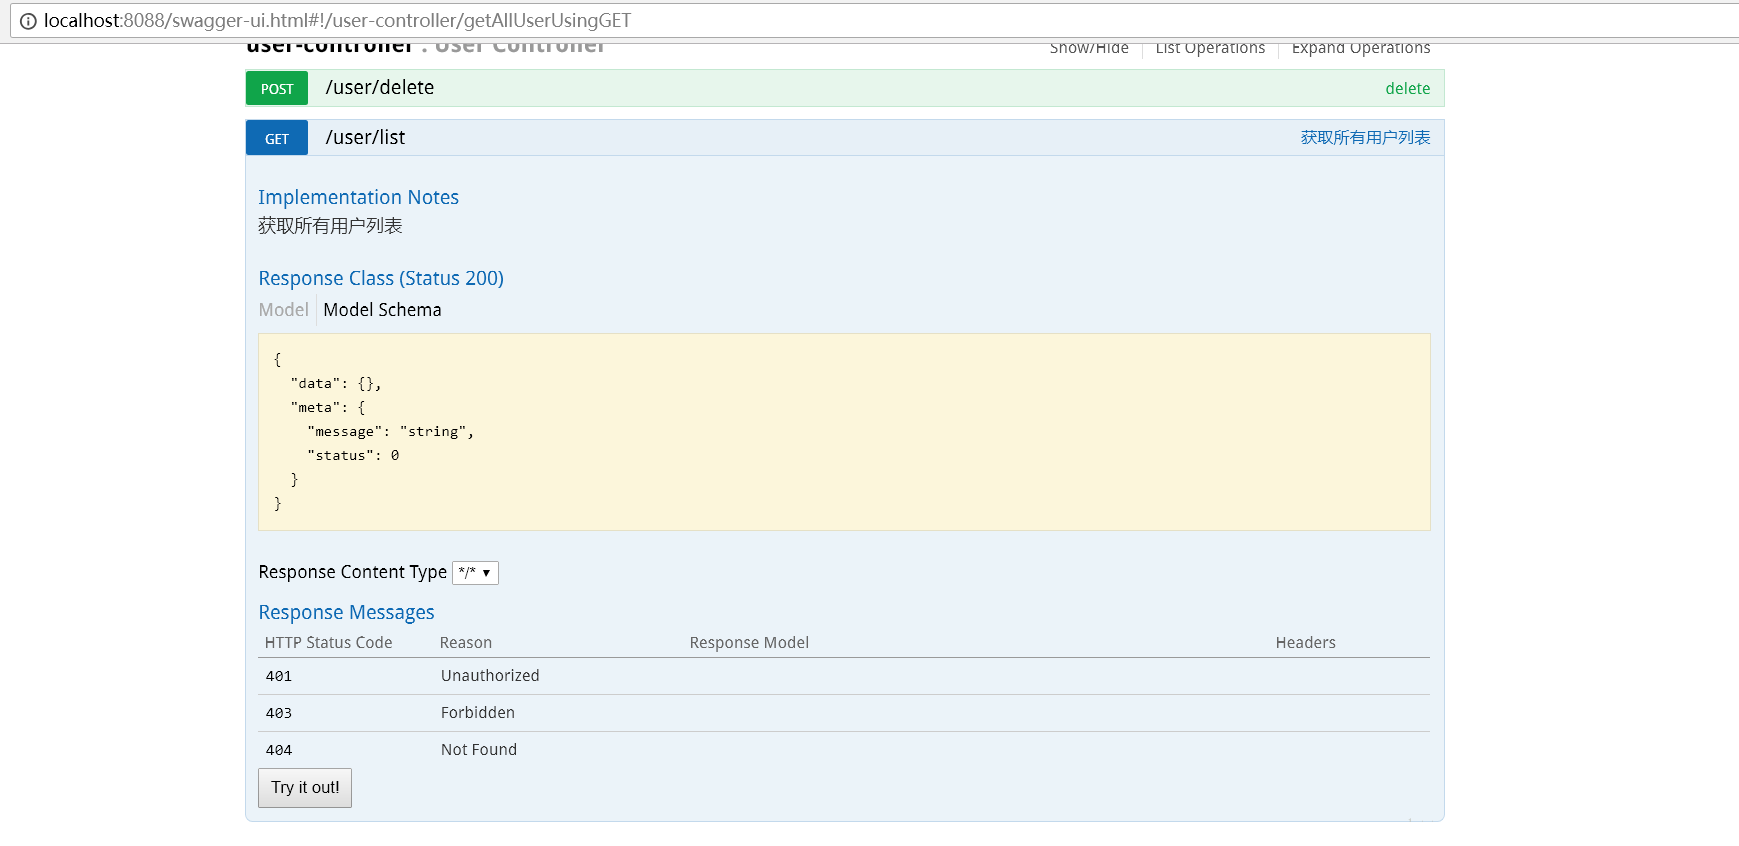
测试结果如下:

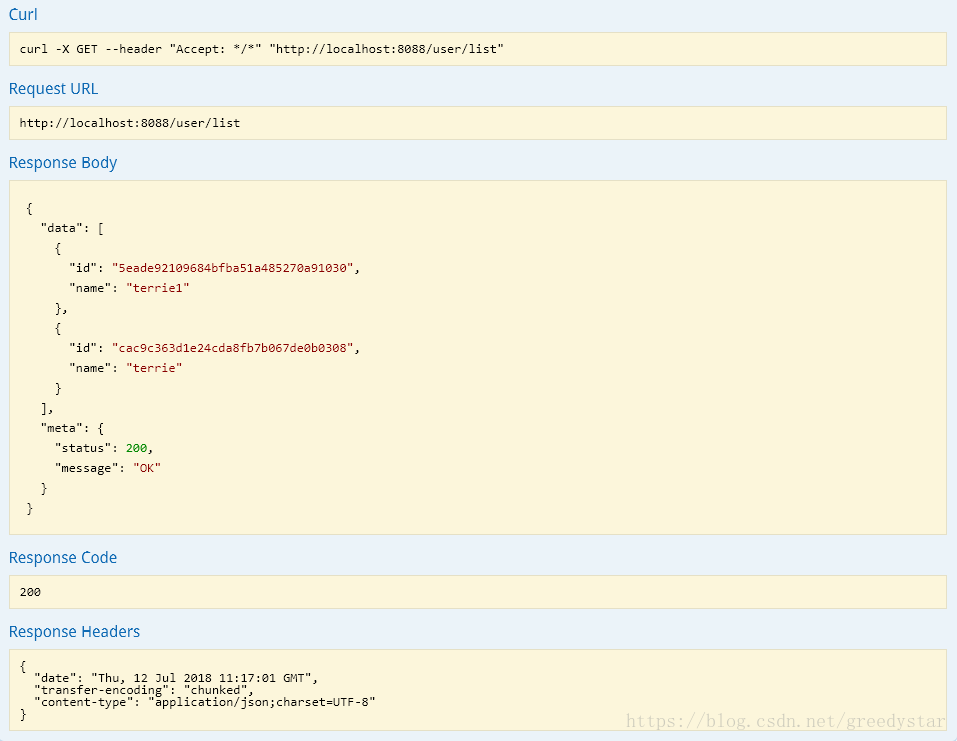
这里的返回结果是进行了封装了统一相应格式,具体的实现请参考源码。

总结

SpringBoot为我们提供了简洁的配置方式,可以让开发人员更注重业务的实现。

Druid由阿里开源,是非常优秀的Java数据库连接池,而且具有很强的监控功能,值得我们深入学习。

Swagger2为我们提供了一个简单的在线API文档平台,而且可以进行接口测试,是后端人员的福利工具。

经过一番配置和测试,我们最终完成了SpringBoot整合Mybatis、Druid和Swagger2,搭建了数据源监控、日志记录以及在线Api文档平台,这个项目作为学习的开端,也将会作为以后学习过程中使用的种子项目。

最后,附上源码:https://github.com/GreedyStar/spring-boot-demo

最后的最后,安利一下自己写的一个Java代码生成工具,能够方便的生成Spring、SpringMVC、Mybatis架构下的Java代码,希望能对大家有所帮助,地址:Java代码生成器:Generator